For this project, you will be creating a set of 3 or more animated GIFs with the same theme. To do so, you will need to know basic Photoshop animation skills. You will also need to think about what part of your daily life you could represent.
LEARNING TARGETS:
- I can use the artistic process to come up with an idea to make animated GIFs
- I can use my knowledge of Photoshop to create short animations
Skills practice: tutorial
|
**The Animation menu has moved in Adobe CC** You can find it under Window>Timeline then change to Frame Animation
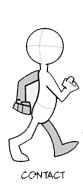
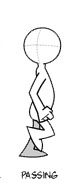
Watch How to animate in Photoshop and create the walk cycle animation. You may use the pictures from the document below or take your own.
|
| ||||||||||
investigate: HOW DO ARTISTS use gifs?
Brainstorm- list 10 ideas for your GIFs
Your GIF should give us insight into your everyday life and experience. Think about the things that you notice that others might not or how to represent your experience.
Your GIF should give us insight into your everyday life and experience. Think about the things that you notice that others might not or how to represent your experience.
Plan
Create a finalized sketch sequence for each GIF that shows how you are planning to make the GIF move. Your sketch should show at least 3 frames.
Create
Make your GIFs!
How to Upload your Photos to create GIFs
How to Upload your Photos to create GIFs
- Gather the images you want to animate into one folder.
- Click File > Scripts > Load Files into Stack. When the “Load Layers” window pops up, click Browse to select & open your image files, and then click OK. This should import the files you selected as individual layers in your document. Rearrange the layers into the correct order, if necessary.
- This next step differs depending on what version of Photoshop you have:
- For Photoshop CS5: Open the Animation palette (Window > Animation).
- For Photoshop CS6: Open the Timeline palette (Window > Timeline ).
- For Photoshop CC (Creative Cloud): Open the Timeline palette (Window > Timeline ). In the middle of the palette, you will see a button with a drop-down allowing you to choose either “Create Video Timeline” or “Create Frame Animation.” You want to choose & then click the Create Frame Animation button.
- In the Animation/Timeline palette menu (found under this button at the top right corner of the palette: ), click Make Frames From Layers. You can also click Reverse Frames if needed. This will take each layer in your document and set it as an individual frame in the animation.
- Now we will change the duration of each frame. Make sure you are in frame view, not timeline view. If you do not see thumbnail icons of all your layers in the Animation/Timeline palette, click the icon in the lower right corner (the hover text will say “Convert to Frame Animation”). Now, back in the Animation/Timeline palette menu, click Select All Frames.
- Click the drop down button just underneath each frame image. This will bring up a menu where you can set a duration. Since all frames are selected, all frames will be set to the same time. Each frame can be changed individually, if desired.
- The drop down button circled in black in the image above will change how many times the animation will loop; either a fixed number of times, or forever.
- Once the frame order and timing as been set up, it is time to save the image! Click File > Save for Web & Devices, make sure the file format is set to GIF, change any other options if needed, and save the image!
